
If you want to know the true story of a weld’s strength, quality, and craftsmanship, you only need to look at one thing: the weld bead. The weld bead is the literal backbone of the joint. It is the distinct path of filler metal left behind after a welding pass, and it serves as a visual signature of the welder's technique. To the untrained eye, a weld might just look like a rough line of melted metal. To an expert, however, that bead immediately reveals whether the joint will hold up under extreme pressure.
Whether you are a beginner picking up a torch for the first time or a DIYer looking to quality-check your work, understanding the anatomy of a weld bead is essential. We break down exactly what a weld bead is, explore the key factors that shape it, and provide a clear guide on what a perfect weld looks like so you can weld, and inspect, with total confidence.
Fundamental Concepts: Defining the Weld Bead
A weld bead is the line of deposited metal left behind after a single pass of welding along a joint. It forms when the base metal and filler material melt together and then solidify. The result is a metallurgical bond between two pieces of metal.
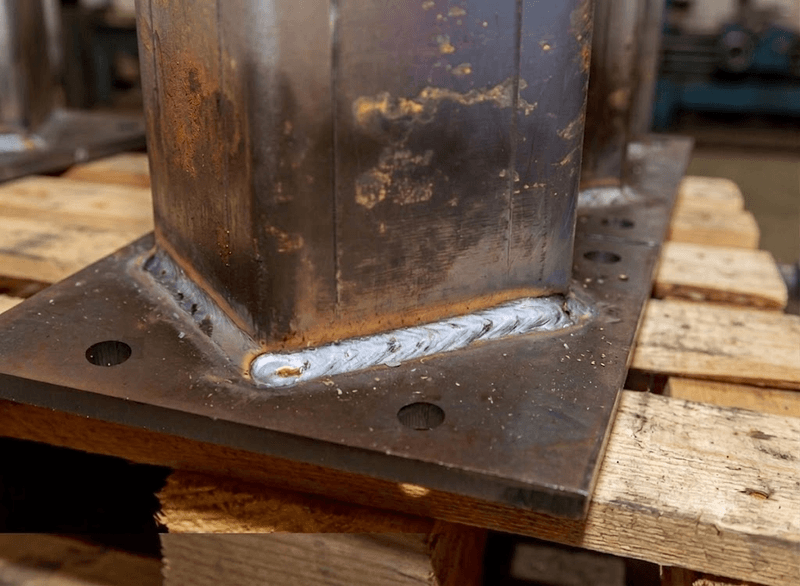
Torch angle, travel speed, and how you move the electrode all directly shape the bead. Change any one of those variables and the bead looks and behaves differently. That's why two welders can run the same process with the same settings and still produce noticeably different results.
The bead isn't just aesthetic. It reflects what happened during the weld. Its shape, texture, and consistency reveal whether heat was controlled, whether penetration was adequate, and whether the joint will hold under load.
Types of Weld Beads
Novice welders typically begin by mastering two fundamental bead types. Gaining proficiency in these is a prerequisite for more complex techniques:
- Stringer bead: Created with minimal to no lateral movement, this slim bead travels straight along the joint. It is the preferred choice when precise, low-heat input is required.
- Weave bead: This wider bead is formed using a specific side-to-side motion. Its increased surface coverage makes it ideal for thicker materials or for bridging substantial gaps.
Overlapping beads are essential for multi-pass welding and involve placing beads next to or over existing ones to gradually strengthen and complete a joint.
Every bead type serves a specific purpose. Developing the judgment to select the right one for the task at hand is a key milestone in a welder's training.
Each type has its place. Knowing when to use one over the other is part of developing sound judgment at the booth.
Recognizing Excellence: The Hallmarks of a High-Quality Weld Bead
Expertly crafted weld beads possess distinct, identifiable traits. With sufficient exposure to these standards, identifying a deficient weld becomes an intuitive process.

Here's what to look for:
- Uniformity: Even width and consistent height along the entire length of the joint. No gaps, no sudden changes in profile.
- Straightness: The bead follows the joint without wandering. A drifting bead signals a loss of control during travel.
- Smooth profile: The bead should be slightly convex and flow into the base metal without steep or irregular edges.
- Minimal spatter: Some spatter is expected with certain processes, but excessive spatter often points to incorrect settings or technique.
- No surface defects: Cracks, porosity, or visible holes are never acceptable. They indicate a problem with heat, shielding, or base metal preparation.
- Proper penetration: The molten metal must fuse into both pieces of base metal. A bead sitting on top of the surface without real tie-in isn't a weld worth trusting.
Interpreting the Messages in a Poor Weld Bead
A substandard weld bead serves as a critical diagnostic tool rather than merely a cosmetic flaw. For instance, the presence of undercut along the edges is a clear indicator that the travel speed was too sluggish or the heat intensity was excessive. Conversely, a bead that appears ropy and convex, failing to fuse smoothly with the base metal, typically points toward an incorrect electrode angle or a lack of sufficient heat.
The appearance of porosity, small, scattered voids within the bead, frequently signals the presence of contaminants such as rust, oil, or moisture on the base metal. In wire-based processes, this can also suggest issues with the shielding gas. Regardless of the specific cause, the bead effectively communicates that there was a failure in the preparation or setup phase. Furthermore, erratic width or wave patterns are often the result of an unstable arc or inconsistent travel speed.
Developing the skill to accurately interpret these defects requires both hands-on experience and a commitment to honest self-evaluation. Progressing as a welder depends on this ability to independently scrutinize and diagnose your own work without external prompting.
Mastering Core Welding Skills
Welding training starts with a solid grasp of the weld bead. This fundamental skill is essential; you must be capable of laying down a controlled, clean bead before attempting pipe work, passing qualification exams, or advancing to specialized welding roles.
At Arclabs, our programs are centered on this very foundation. We prioritize practical experience, with over 95% of your time spent training hands-on in the booth. Our experienced instructors guide students to not only master the technique but also to critically assess their own results. A vital part of this journey is learning how to perform an honest evaluation of your own craftsmanship.
The new Arclabs San Antonio campus provides the next generation of South Texas welders with professional labs and a curriculum focused on practical, real-world expertise.
To start your journey toward trade mastery, you can browse all our locations, get in touch online, or call 877-647-4111 to discuss your training path with an admissions advisor.

